The recordings of the second live class on Sequential Stretching™ are now available to view (45 min). Included are the rise from couch stretch sequence, and the first individual student lessons on neck and hips flexibility.
Come attend the second live class on sequential stretching™. I will lead the class on the Zoom video conferencing platform. I will be recording the class for later viewing if you are unable to attend live. Apologies for the recording not working on the first class.
This class will be run a little differently from the first class. To encourage more interactivity and to help students learn more effectively, most of the class time will be spent on individual lessons. This will be similar to how many singing classes are taught with volunteers taking 5-10 minute turns to be the student of focus. I suspect that students will have different struggles that would be better addressed individually instead of trying to make all directions the same for everyone. Those who are not the current volunteer will be able to observe and follow along if desired.
Topics will include (time permitting):
Introduction: How flexibility is lost and restored
Rise from Couch Stretch
Individual Stretch Lessons (5-10 min ea)
Dresser Stretch Lower
For the two planned stretches, it would be good to have a couple of pieces of furniture handy:
A sofa or a chair that will stay put if you push your back into it.
A dresser, counter, or table approximately crotch or hip height that won’t easily tip
Please wear comfortable clothes suitable for a yoga class or otherwise flexible clothing. Ideally please attend in a room free from distractions with a yoga mat or carpeted floor area for stretching.
Make sure to have a signed waiver on file before attending. If you filled out a waiver for the first class, that is sufficient.
Will you attend? Please leave a comment on this post.
Time: Apr 2, 2022 01:00 PM Pacific Time (US and Canada)
A friend of mine likes to refer to Sequential Stretching™ as meditative stretching, but my partner thinks it is not meditation. After some research and reflection, I believe they are both right, in a way. After reading this article, I hope you try some meditative techniques during a stretching session because meditative stretching is one of the most wonderful things I have experienced.
“to engage in mental exercise (such as concentration on one’s breathing or repetition of a mantra) for the purpose of reaching a heightened level of spiritual awareness”
Other definitions indicate the goal of meditation is:
“to achieve a deeper, more devout, or more relaxed state.”
Benefits of meditation
Mayo Clinic lists many emotional benefits of meditation:
Gaining a new perspective on stressful situations
Building skills to manage your stress
Increasing self-awareness
Focusing on the present
Reducing negative emotions
Increasing imagination and creativity
Increasing patience and tolerance
They also name many illnesses that meditation can help manage:
Anxiety
Asthma
Cancer
Chronic pain
Depression
Heart disease
High blood pressure
Irritable bowel syndrome
Sleep problems
Tension headaches
Sequential Stretching as Meditation
When I stretch, I am engaging in mental exercise, but my purpose is not to reach a heightened level of spiritual awareness, nor to achieve a deeper or more devout state. However, one of the primary goals of SS (Sequential Stretching) is to achieve a more relaxed state.
A more relaxed body is a more flexible body. I emphasize that stretching should not just be about pulling on tight soft tissues to make them longer. Stretching should be about finding ways to convince your mind to let go of unnecessary tension so that the body can relax. Once your body is sufficiently relaxed, it is a simple matter to move to a body position that is slightly out of your normal range of motion, then relax further to let the hibernating postural muscle fibers gently engage.
Some people may find that SS can be used for purposes like achieving a heightened level of spiritual awareness, a more devout state, or mental clarity. I think those are excellent uses of this technique. It’s not why I do it, but the gentle, mindful, repetitive motion of SS makes it ideal to use for those goals.
If you stick to the Merriam-Webster definition of meditation, then my personal practice of SS doesn’t qualify due to my purpose being different. However, performing an action for a different reason doesn’t really change the outcome of that action. Therefore, I expect that the emotional and illness management benefits of meditation would still apply.
I have personally experienced many of those benefits since I started SS, including lower blood pressure, reduced chronic pain, increased self-awareness, improved mental focus, and increased patience.
How to Meditate with Sequential Stretching
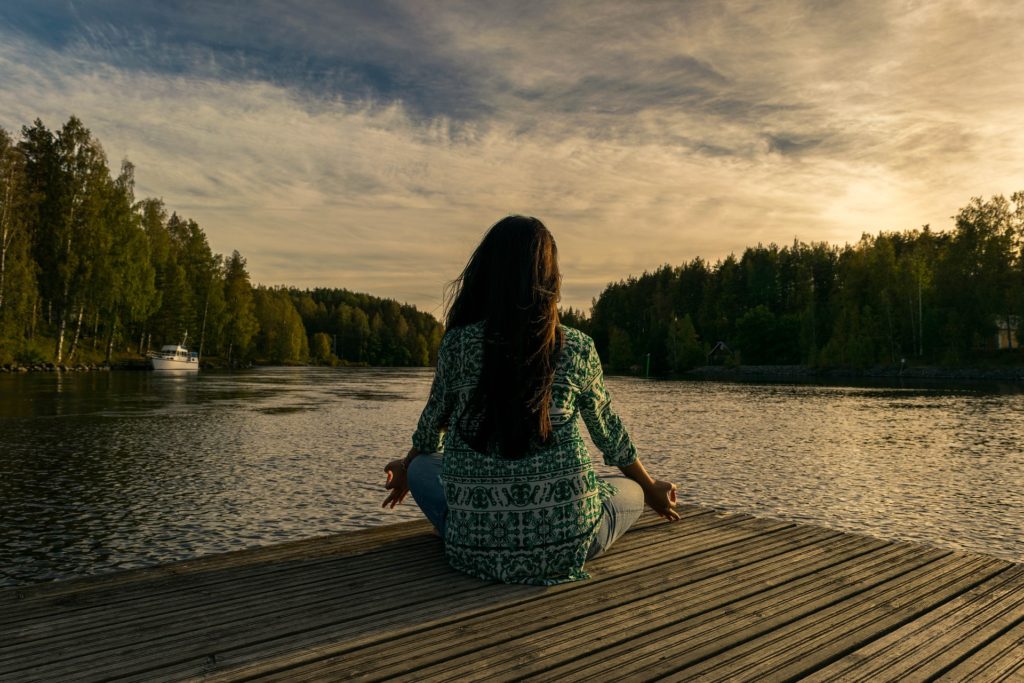
My favorite way to stretch is to go into what I call the cocoon. I go to a quiet, temperate, carpeted room, turn off all the lights, close the door, and shut the curtains tightly to make it as dark as possible before starting a stretching session. I typically do this just after using cannabis, as I do for 80-90% of my stretching time, due to the muscle relaxation and psychedelic effects.
This careful arrangement of my stretching environment is an example of sensory deprivation: the deliberate reduction or removal of stimuli from one or more of the senses. By removing external stimuli, I can focus my mind more fully on the sensations and sounds of stretching. This allows me to stretch more gently because I can sense microreleases at a shallower stretch level, especially if I can hear the soft sounds of tension release.
A quiet, completely dark room can be difficult to achieve, but using earplugs and just closing your eyes can have similar effects. A yoga mat is helpful if there is no carpet available.
Keeping your mind from wandering to random thoughts is also key to meditating with SS. This is often the hardest part for me to achieve. Tension visualization is one of the best ways to focus more of your brain cells on stretching. This involves mentally picturing a representation of the varying levels of tensions throughout the range of motion felt while moving through the sequence. Creating this mental picture and updating it each time you move slightly takes a lot of mental focus and keeps your mind too busy to wander. Another way to keep focus is to visualize those random thoughts floating happily away in a bubble before turning your attention back to the sensations from your body.
Focusing the Mind on Stretching
The muscles and soft tissues of the human body have billions of sensory nerve cells potentially providing input to the brain at any given moment. There is usually way more sensory information coming into the brain than it can effectively process, so much of that input gets discarded. By reducing the amount of extraneous input, you can make use of more relevant information on tightness, muscle engagement, and release to make more effective stretching decisions.
During a stretch sequence, there are a huge number of possible directions to move, speeds to move at, as well as decisions on when to pause, when to trigger a microexpansion or area expansion, when to pick more effective positioning points, and when and where to send a relaxation signal. There is usually not only one correct decision out of all of these possible directions, but the more relevant input on sensations and sounds you can process, the more likely you are to make choices that will keep the number of tension releases high while keeping overall tension levels low. A high number of tension releases per minute is the main indicator of how quickly you will improve your flexibility. If you keep overall body tension low while stretching, you will also avoid fatigue and soreness that would require more recovery time before stretching more.
Effects of Meditating with Sequential Stretching
Upon emerging from the cocoon after 30-60 minutes of gentle stretching, I feel more calm and focused than most any other time in my life. I also usually feel like I’ve had one of the best stretching sessions ever. It’s a feeling that I treasure greatly and one I hope all of you reading this experience.
Come attend the first-ever live class on sequential stretching™! I will lead the class on the Zoom video conferencing platform. I will be recording the class for later viewing if you are unable to attend live.
Make sure to have a signed waiver on file before attending.
Topics will include (time permitting):
Sequential Stretching Basics
First Stretch: Touch shoulder with hand
My flexibility story
Second Stretch: expanding cavern
Intro to SS flexibility theory
Third Stretch: Walking Tripod
Technique focus
Questions / conclusions
Please wear comfortable clothes suitable for a yoga class or otherwise flexible clothing. Ideally please attend in a room free from distractions with a yoga mat or carpeted floor area for stretching.
I’m excited to announce the very first full introductory training videos on Sequential Stretching™. The full training is about 49 minutes long. My goal was to record something comparable to what I might teach in a beginner’s class.
Full Training Playlist
Individual Sections
Overview & Basics
Touch Shoulder with Middle Finger Stretch Sequence
My Flexibility Story
Expanding Cavern Stretch Sequence
Introduction to Sequential Stretching Flexibility Theory
This is a stretch sequence that helps to relieve tension in the hips, legs, and spine. The motion is similar to the arm motion in the breaststroke swimming stroke.
Sequence Steps
Begin by standing upright with your feet apart at hip width.
Place your hands together with the tips of your fingers touching and pointing horizontally away from you just in front of the middle of your chest.
Find a comfortable balance point on your feet with your weight mainly on the fronts of your heels and a small amount of weight on the fronts of your feet. Very slightly shift your weight forward and back, then side to side to find the optimal balance point where you feel the least amount of effort to remain standing in this position.
Move your wrists gently together and apart to find the position with the least tension in your wrists and fingers. Shift your shoulders slightly to make sure you are not holding onto any unnecessary tension in them.
Picture yourself very slowly reaching your hands as far in front of you as possible. Assure yourself that a body free of tension can reach far in front of you without sensing any muscle tightness. Use this assurance to quickly recognize when your body is tightening up so that you can relax those muscles before they cause a higher level of tension.
Take a deep breath in. On the exhale, send a deep wave of relaxation throughout your body, while keeping your hands at the same position.
Begin very slowly moving your hands directly ahead, allowing your body the freedom to re-arrange itself to keep your balance point on the fronts of your heels.
When you are as relaxed and balanced as you can be with this position of your hands, allow your hands to move a few more millimeters forward.
When your hands get as far away from your chest as they can be without getting too tight, pause for a few breaths here to see if you can make this position of your hands in space any more relaxed.
Next, slowly rotate your elbow outward so that your palms are facing down.
Begin slowly moving your hands apart so that your arms and torso will eventually form a T with your shoulders remaining at their current position.
When your arms form a straight line, allow your hands to slowly drop to your sides, keeping all of your muscles as relaxed as you can.
Then, slowly roll up your upper back and shoulders, leaving the head to come up last.
Tips:
If any sustained or sharp pain or muscle spasm is felt during the sequence, immediately move to a comfortable position. Remember where the pain was felt so that you can steer around the pain and move more slowly and gently near that position.
Keep checking that your balance is still on the fronts of your heels and adjust if you are too far forward or back.
The more quickly your body starts to tense up as you move, the slower you should move. This sequence starts out pretty relaxed, but as you reach forward further, your body may tense up quicker, so you might start out by moving fairly quickly, but slow down as your hands get farther from your chest.
Think of each tiny movement forward as being a pose that you want to make as relaxed as possible. The combination of all these poses in order constitutes what I call a stretch sequence. The more relaxed you make each of these poses, the better the stretch you will get.
Closely monitor the muscles throughout your body to listen for any tension that starts to creep in, especially your shoulders, arms, legs, and spine. If any muscles start to grab, pause and use a few deep breaths to release those muscles while keeping your hands at the same position.
At each of these positions, imagine your hands have to remain here for several minutes, finding a body positioning that will allow you to do so comfortably.
Allow your body to reorganize itself with each exhale, with the only requirement being that you keep your hands at the current position. Your shoulders are free to round and your hips are free to bend, but keep your knees straight.
Keep the motion as slow as possible so that any tension that creeps in can be quickly relieved.
This is a stretch sequence that helps to relieve tension in the hips, legs, and spine. The motion is like squatting down, then standing back up.
Sequence Steps
Start by standing upright with your feet about hip-width apart and pointed slightly outward.
Find a comfortable balance point on your feet with your weight mainly on the fronts of your heels and a small amount of weight on the fronts of your feet.
Very slightly shift your weight forward and back, then side to side to find the optimal balance point where you feel the least amount of effort to remain standing tall.
Picture yourself very slowly squatting down to the ground. Assure yourself that a body free of tension can squat all the way down without sensing any muscle tightness. Use this assurance to quickly recognize when your body is tightening up so that you can relax those muscles before they cause a higher level of tension.
With each exhale, imagine a wave of relaxation traveling to any tight areas of your body, releasing them from the burden they try to take while keeping your chest at the same position in space.
Begin the squat motion by very slightly bending your knees, allowing your tailbone position to get a few millimeters closer to your feet.
If any muscles start to grab, pause and use a few breaths to release those muscles while keeping your tailbone at the same position. Check your balance point again and shift your weight as needed to bring your weight back to the fronts of your heels.
When you are as relaxed as you can be at this position of your tailbone, allow yourself to slowly drop a few more millimeters.
At each of these positions, imagine your tailbone has to remain here for several minutes, finding a body positioning that will allow you to do so comfortably.
You may find your breathing gets heavier and faster as you get lower in the squat as muscles tense up quicker, demanding more frequent exhales to relax them.
As you get near the bottom, try to keep even the last bits of releasing the position of your tailbone slow.
Relax for a while at the bottom of the squat. If your legs are too fatigued to slowly reverse the squat back up, just sit back and relax until you are ready to stand back up.
When you are ready, begin to reverse the process by slowly allowing your tailbone to rise a few millimeters at a time. Try to keep each position as relaxed as possible by performing it as slowly as possible.
As you slowly come back up to a standing pose, keep checking that your balance is still on the fronts of your heels and adjust if you are too far forward or back.
Keep using the exhale of each breath to relax muscles as soon as they get the slightest bit of tension.
Tips:
If any sustained or sharp pain or muscle spasm is felt during the sequence, immediately move to a comfortable position. Remember where the pain was felt so that you can steer around the pain and move more slowly and gently near that position.
Allow your body to reorganize itself with each exhale, with the only requirement being that you keep your tailbone at the current position.
If your inner hips start to tighten up, feel your hips opening wider on the next exhale, giving room for the hips to relax again.
The lower you get in the squat, the more difficult it will be to remain completely relaxed. At some point, you might need to settle for some muscles being tight from that point. Keep trying to relax the nearby muscles that don’t feel as tight as your get lower.
If your muscles start to fatigue so that you can’t keep going as slowly, feel free to speed it up a bit. When you get strong enough, you’ll be able to go very slowly all the way to the bottom.
Keep the motion as slow as possible so that any tension that creeps in can be quickly relieved.
If rising slowly causes too much muscle fatigue, feel free to speed up a little to make it easier.
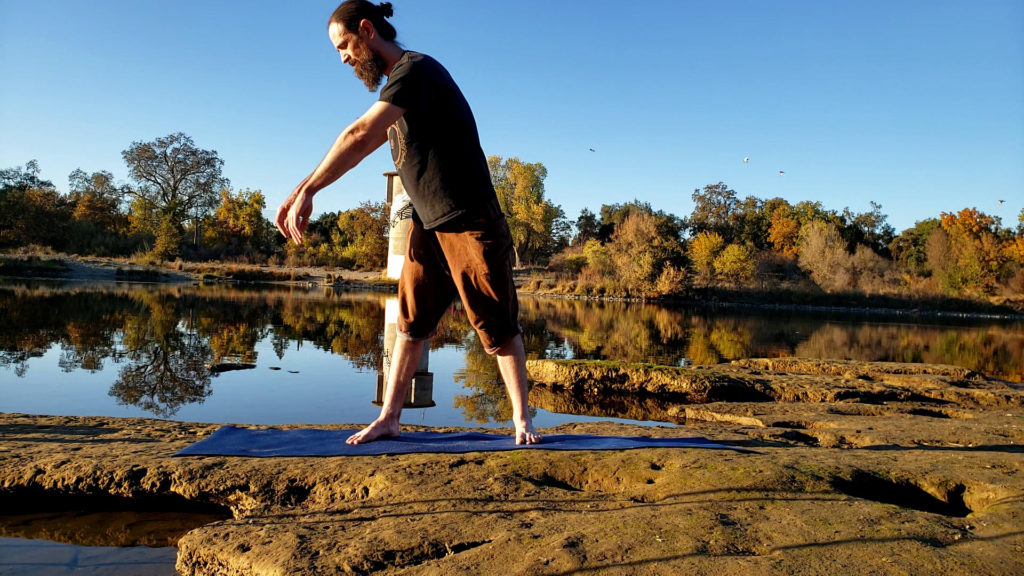
This is a stretch sequence that helps to relieve tension in the legs and spine. The sequence involves slowly transitioning from a standing position to a forward folded position.
Standing fold sequence sped-up, then close to expected speed.
Sequence Steps
Enter the initial position for the sequence:
Stand upright with your knees straight, feet a little wider than hip-width, and arms loosely hanging at your sides.
Imagine the back of the top of your head were suspended by a string and your shoulders are hanging loosely back and low.
Balance your body evenly over your feet, both right to left and front to back. Most of your weight should be on the front of your heels, but make sure the balls of your feet take a small part of the weight as well. Shift your weight slightly left and right, then forward and back, being mindful of how being slightly off-balance in each direction feels in your body. Return to the balance point that feels the most centered, grounded, and requires the least muscle engagement to maintain.
Take a deep breath. When you exhale, focus on the back of your head maintaining its current position, but every other muscle releasing as much as possible.
Picture yourself folding over at the waist with knees straight and your hands touching the floor. Mentally assure yourself that:
A body free of tension will feel relaxed in the legs and spine in all positions between the initial position and the fully folded-over position.
The cause of any position in between these feeling any tightness is muscle tension, not just engagement.
Slowly fold down to the floor
Very slowly begin folding over by positioning your chest slightly closer to your feet, just enough so that you can tell that you have moved. Recheck your balance, as in step 1a. Imagine that you need to keep your chest at this position for several minutes. Find the most comfortable body position possible while maintaining this chest position.
Keep slowly moving your chest a little closer to your feet, pausing frequently to perform a microstretch. This means: check your balance and relax your body as much as possible for each given position. As your lean further over, allow your hands and head to gently drape downward. Make sure to release your shoulders and neck as their weight begins to hang downward.
Relax at the bottom
When you reach the bottom of your range of motion in this sequence, unless you are already extremely flexible, the weight of your upper body will be supported by the tightness of your posterior chain muscles. Don’t use any force, apart from gravity, to push any closer if you can’t reach the floor at this point.
If your hands, or at least fingers, reach the floor with only the force of gravity, use them to take some of the weight off your posterior chain by pushing them lightly into the floor. Alternately, grab your ankles, shins, or knees and use them to support some of your weight.
Slowly roll back up to the top
Begin by gradually transferring weight from your hands back to your feet so that you can release your hands gently without a sudden weight shift to your feet.
Reverse the fold by slowly raising your chest further from your feet. Take frequent pauses to make sure each position is as relaxed as possible. Feel each vertebra come into position one at a time as they roll-up. Pay special attention to gently shifting your shoulder blades together when your upper back begins to straighten. Make sure the neck is the last thing to roll up. As your head reaches the top, continue the unrolling up the back of your throat and into the top of the back of your head.
Repeat the folding/unrolling motion and microstretches for as long as microreleases are sensed and time permits. Microreleases are tiny releases of muscle tension which may be perceived as pops, cracks, tingles, foreign-feeling muscle sensations or movement, choppy motion, and/or temperature changes.
Background
This sequence is similar to a common stretch sequence performed in yoga classes with the Uttanasana (standing forward bend) yoga pose and roll-up. The main differences in this version are the much slower speed and microstretches.
Tips:
Keep the motion as slow as possible so that any tension that creeps in can be quickly relieved.
Throughout the sequence, keep your center of gravity as close as possible to the natural human flat-footed balance point. When these are aligned, the strength required to keep from falling forward is equal to the strength required to keep from falling backward. The natural human flat-footed balance point lies at the midpoint between the fronts of the heels. As you bend further forward, feel how your upper body weight pulls you slightly forward, putting more weight onto the balls of your feet. This pulls your body off balance, causing your ankle and shin muscles to engage to keep you from falling forward. Correct this by using your feet to shift your weight slightly backward, returning the majority of the weight to the front of your heels. Feel how this allows your ankles and shins to relax. Visualize your perceived center of gravity as a dot on the floor. Keep moving this dot back to the natural balance point.
Don’t worry about positioning your spine, head, or hips as you fold. Your body knows how to position them correctly when you focus on the positions of your center of gravity and chest while keeping your overall body tension as low as possible.
You will likely find certain muscles in your legs or spine start to tighten up at different points of the fold. They may suddenly feel like they are carrying a heavy load and getting tired. There are lots of muscles between your chest and your feet that can handle parts of the burden of maintaining your body position and balance. If one muscle feels fatigued, redistribute the workload to adjacent muscles by releasing, or partially releasing, the tight muscles, but maintaining the chest-to-feet positioning. If the fatigue is still too much, allow your chest position to fall a bit so that the load falls on different muscles.
Don’t rush down to the bottom of the fold, as is typical in yoga. The further down you fold, the more muscles in the posterior chain will reach their flexibility limit and tighten up. The faster you go down, the more likely that protector muscles will tense up and cause pain or stop you from going further down. There may still be useful stretching even when lots of these muscles have reached their limit, but the tighter this chain is, the harder it is to release tension. The most effective release of tension happens when there is only very light tension in the muscles, which will typically be near the top of the fold.
As you get further toward the ground, tension will likely increase quicker from small drops than near the top. Compensate for this by moving smaller amounts between microstretches when tension is higher.
If any sustained or sharp pain or muscle spasm is felt during the sequence, immediately move to a comfortable position. Remember where the pain was felt so that you can steer around the pain and move more slowly and gently near that position.
Be extra gentle with yourself while doing this sequence. Muscles of the spine can be fragile and prone to muscle spasms. Gentleness also helps increase the tension release rate while preventing injury.
Try this sequence in a completely silent place if you can find one or with earplugs. Microreleases during this stretch often make audible sounds like pops, clicks, and cracks even in very light levels of tension. Many of these will be very low volume and only audible to you, as the sounds travel better through your bones, muscles, and tendons to the eardrums better than through the air. Focus on these sounds of muscle release to help you understand how even extremely gentle movements can release tension.
There are lots of variations of this sequence possible by using different focal points. Try doing it while gently sucking in your abdominal muscles for the entire motion. You can also do it with the shoulders in all four positions: low-back, low-front, high-back, and high-front.
At different points in the sequence, try pressing in different parts of the feet into the ground like you are squishing a bug. Press the big toes down for a while, then relax them and return to the balanced position. Press a side of your heel, the middle of the feet, etc. This helps to engage underactive muscles that may interfere with reaching a lower, more relaxed position.
Demonstration now posted on YouTubeThree legs of the tripod
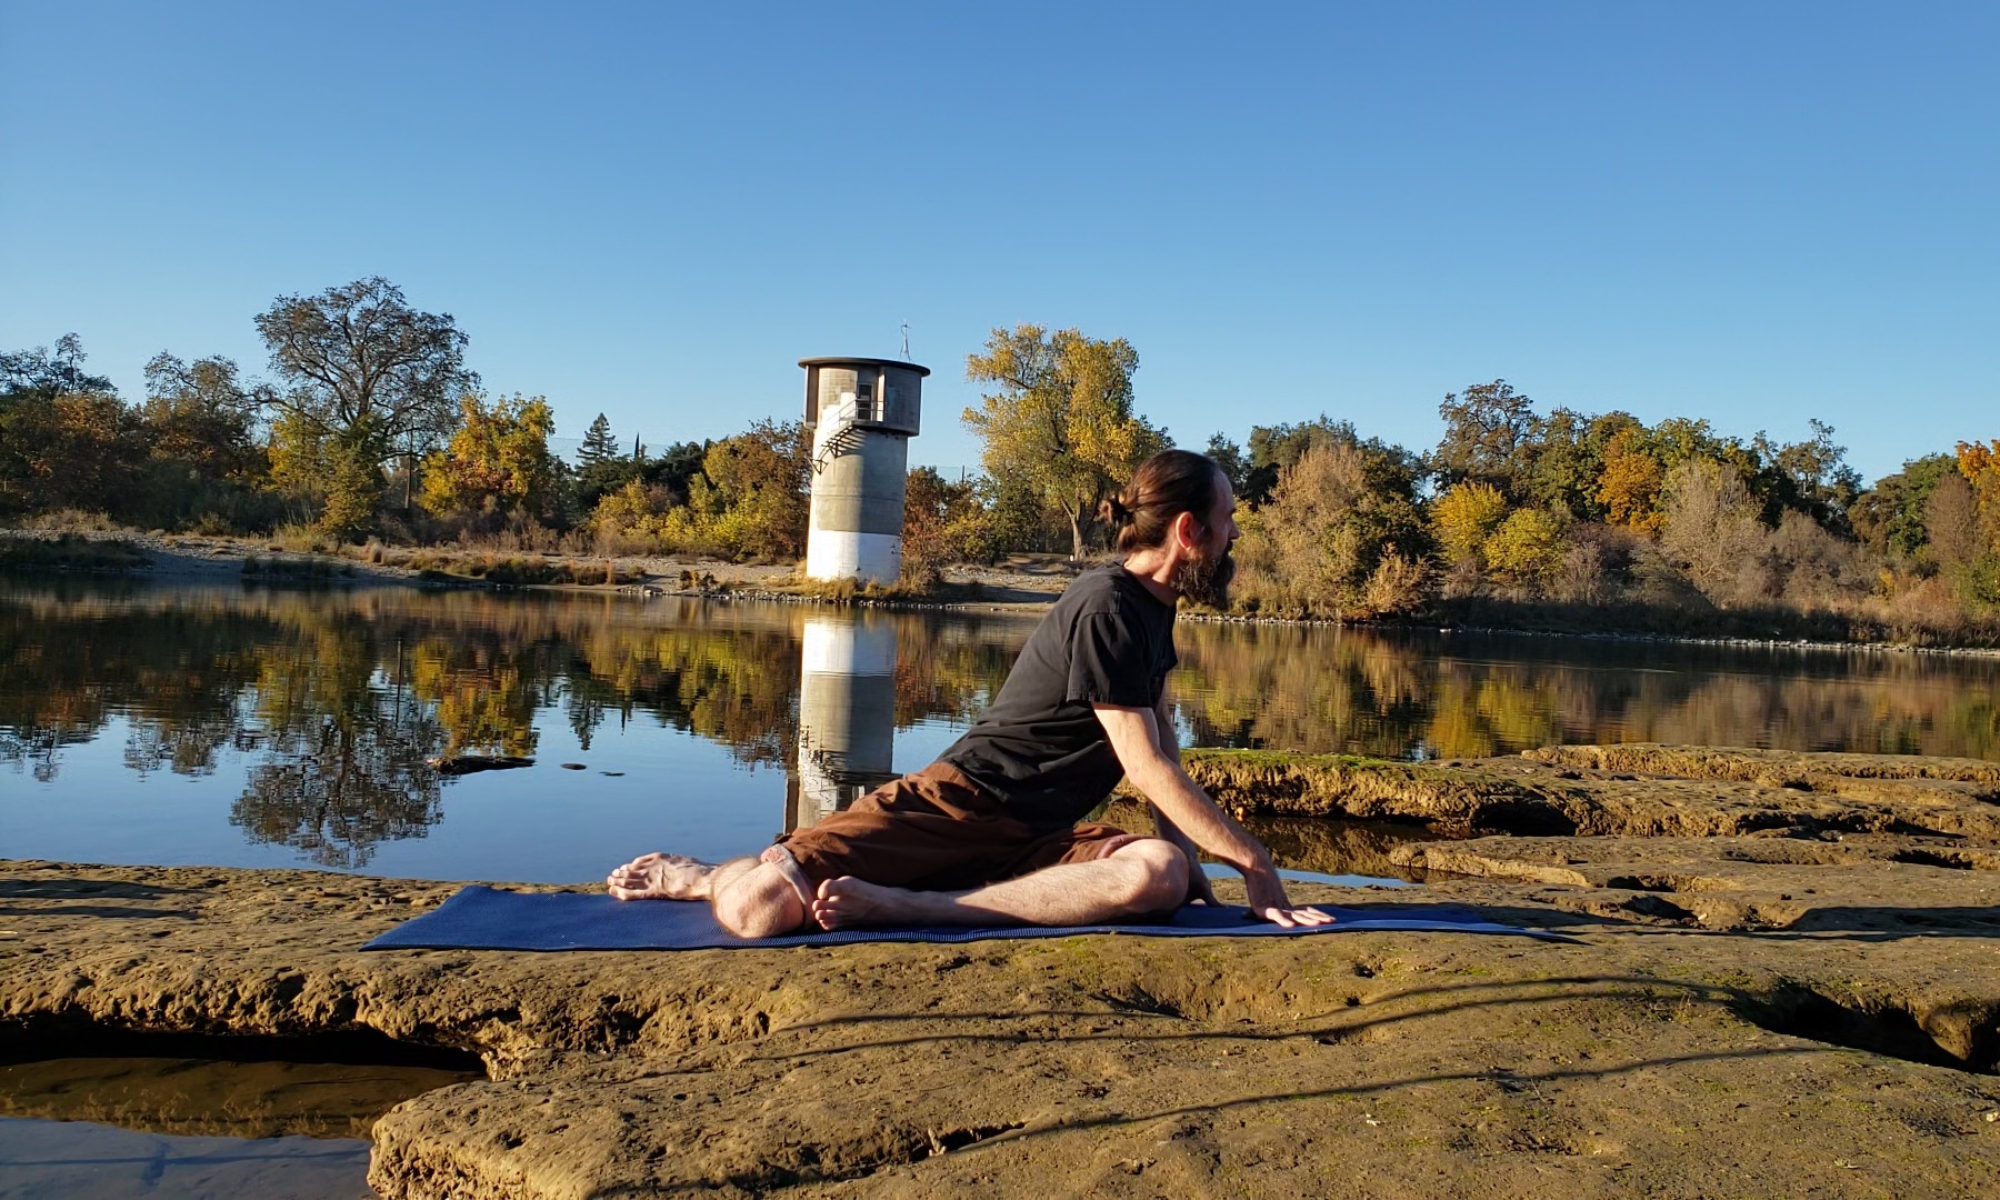
This is a stretch sequence that helps to relieve tension in the hips, quads, groin, and lower back. The motion involves walking your upper body weight around in a series of bends and twists using only your hands and upper body strength while keeping your lower body planted on the floor. It’s called a walking tripod because your body weight is supported by three tripod legs: one hip and the two arms. The hip stays in place while the arms walk around it. Instructions are given for the left-hip walking tripod. The right-hip walking tripod is the same except all the lefts and rights are swapped.
Sequence Steps
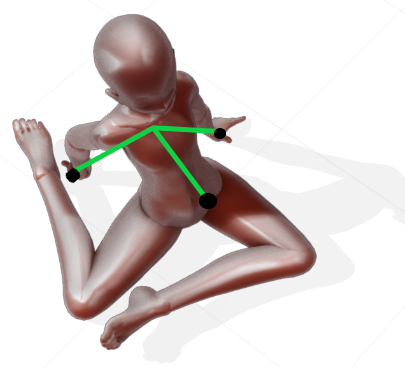
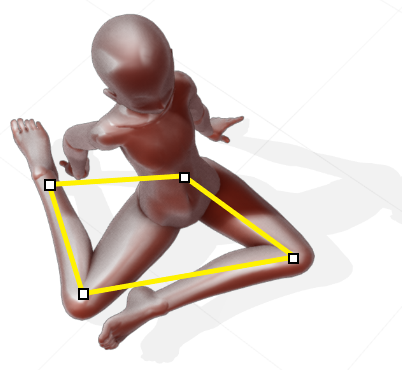
Enter the initial position (left deer pose) for the sequence:
Gently sit on on a carpeted floor or yoga mat with both knees bent at about a 45° angle. Place the inner side of your left leg facing up and the outer side of your right leg facing up with your right knee close to your left foot.
Place your hands on the floor behind you for support. Your hands and left hip form the three feet of the tripod that should support the weight of your upper body. Your lower body – from the middle of your back down to your toes – should not need to engage any muscles in this position and ideally will feel completely relaxed with no tightness.
Slowly shift your body weight so that you feel the weight over each tripod leg for a few seconds, then come back to feeling centered equally over each tripod leg.
Take a deep breath, imagining that your lungs extend into your legs down to your knees. When you exhale, feel the wave of relaxation continue through your legs, allowing your hips and lower back to fully relax.
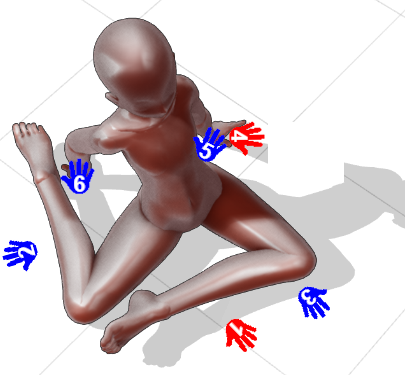
Slowly walk your hands around your body:
Very slowly shift your upper body weight off your left hand to your left hip and right hand by pushing both hands into the floor, causing your chest to lean forward slightly. When the weight is completely off your left hand and is centered over your right hand and left hip, lift your left hand and place it on the floor in front of your left shin.
This time, slowly shift your body weight so that you feel the weight over each pair of tripod legs for a few seconds, then come back to feeling centered equally over each.
Very slowly bend your elbows, allowing gravity to drop your upper body closer to your right knee until you feel slightly higher muscle tension than the initial position in the lower back, hips, or legs. Pause and take a deep breath, relaxing the lower body on the exhale to see if you can return to the deep relaxation of the initial position.
Slowly shift your upper body weight off your right hand to your left hip and left hand by pushing your right hand into the floor. When the weight is completely off your right hand and centered over your left hand and left hip, lift your right hand and place it on the floor in front of your right shin. Gently allow your weight to equalize again on all three tripod legs.
Gently turn your shoulders so that your chest faces your right knee.
Imagine leaning forward so that your chest moves toward your right knee. Mentally assure yourself that:
A body free of tension will feel relaxed in the lower back, hips, and legs in all body positions between the current one and the chest touching the right knee.
The cause of any position in between those two points feeling tighter than this in the lower body is muscle tension, not just engagement, since the lower body is uninvolved in this motion.
Slowly start to bend both elbows, allowing gravity to pull your upper body toward your right knee. If no tension can be felt in the lower body, continue lowering your upper body using your arms to control the speed until a small bit of lower body tension remains after relaxing.
Keeping the upper body slightly bent over, slowly use your hands and elbows to shift your weight from your right hand to your left hip and left hand. When the weight is completely off your right hand and is centered over your left hand and left hip, lift your right hand, cross it over your left hand, place it on the floor in front of your left knee, then gently allow your weight to equalize again on all three tripod legs.
Shift your weight from your left hand. Place it on the floor behind your back into its initial position and equalize the weight.
Use your hands to very slowly shift your body weight from your right hand. Lift and cross it over your left hand. Place it on the floor behind your left hip and equalize the weight.
Slowly turn your shoulders to the left until you feel substantial resistance to turning further.
Shift your weight from your right hand. Place it back into its initial position as your shoulders turn back to the front and equalize the weight.
Repeat the tripod walk around the body in the same manner, attempting to keep the lower body relaxed and uninvolved while the upper body does all the work. Throughout the motions, take brief pauses for microstretches, which may include a deep breath, ensuring each pause of the stretch is performed at the most relaxed level currently possible for that body position.
If the hips, lower back, or legs start to tighten up, pause the motion and use these steps to relieve it:
First, try to maintain the position of the chest by breathing deeply and sending the relaxation from the exhale to the tight area.
Next, if the tightness is minor, try shifting your weight back and forth to different tripod legs to try to convince your body that the tightening muscles are unnecessary to hold up the tripod.
If the tightness continues, move slowly back to a position where the body feels relaxed again. Modify the motion slightly to avoid the tight area.
Background
This is one of the first stretch sequences I developed and is one of my favorites to practice. I can literally spend hours at a time doing variations of this sequence. At the core of this sequence is muscle isolation of the lower body so that it can get into lots of different poses without having to engage. Muscles are much more likely to stretch successfully when they can relax and let other muscles do the work.
I previously named the initial pose “rhombus pose” because it looks like the legs form three sides of a rhombus shape along the yellow lines shown in the picture above. Since then, I found references to this pose as “deer pose.”
Tips:
If any sustained or sharp pain or muscle spasm is felt during the sequence, immediately move to a comfortable position. Remember where the pain was felt so that you can steer around the pain and move more slowly and gently near that position.
Do not try to keep your back straight in any of this sequence. Instead, focus on keeping all of the lower body and spine as relaxed and uninvolved as possible.
Keep the motion as slow as possible so that any tension that creeps in can be quickly relieved.
Every few microstretches, take a really big breath, exaggerating the upper body expansion when inhaling and exaggerating the collapse when exhaling by gently sucking in your belly as far as comfortable.
When moving a hand to a new position, you will briefly have only two legs of the tripod on the floor. Provide a bit more support during these transitions by using one hand as two legs of a tripod with the weight balanced between two sides of the hand using a little wrist strength.
Your knees should not be used for support, although they should remain on the floor for most of the sequence, depending on your current flexibility. If you find that your weight leaves the left hip and balances on one of your knees instead, know that this is reversible muscle tension holding up your weight. Think of this tension like chewing gum holding up a post that needs to fall. As you circle your body in the sequence, feel that gum weakening as the weight begins to return to the hip as the tension releases.
If a section of the sequence is totally relaxed and you feel ready to increase the difficulty, allow your chest to be slightly closer to the floor until light tension is felt and continue the sequence.
There are lots of variations of this sequence possible by using different positions of the legs on the floor. I use the deer pose the most frequently for this type of sequence because my lower body has a larger range of fully relaxed motion in this pose than in other poses.