Playing with Knots and Freeform Stretching

I usually describe sequential stretching™ as a method of moving to many specific, slightly different body poses and relaxing each one. That is how I started doing it myself and it is the easiest method for me to describe and demonstrate, but it is no longer how I spend most of my stretching time. Although I usually start my stretch sequences like that, I spend most of my time playing with my knots and doing freeform stretching. Describing those techniques is complicated, but I believe they are the most effective way to stretch.

Table of Contents

Playing With Knots

Playing with knots is a type of sequential stretching where the focus is on locating, testing, and releasing muscle knots instead of focusing on relaxing a range of movement. It is a method of positioning, relaxing, and activating your body in ways that allow you to sense and release the layers of tight muscle fibers that make up muscle knots. It is performed by first locating an accessible knot, then choosing between two tension release techniques: relaxation and activation. When those techniques stop producing significant tension release or cause the tension level to rise too high, make small pose or movement changes to get the releases flowing again.

The Flow of Knot Play

The following flowchart gives an overview of how to play with a knot and when to move between different stages, starting at Location:

Flow chart of moving between these techniques

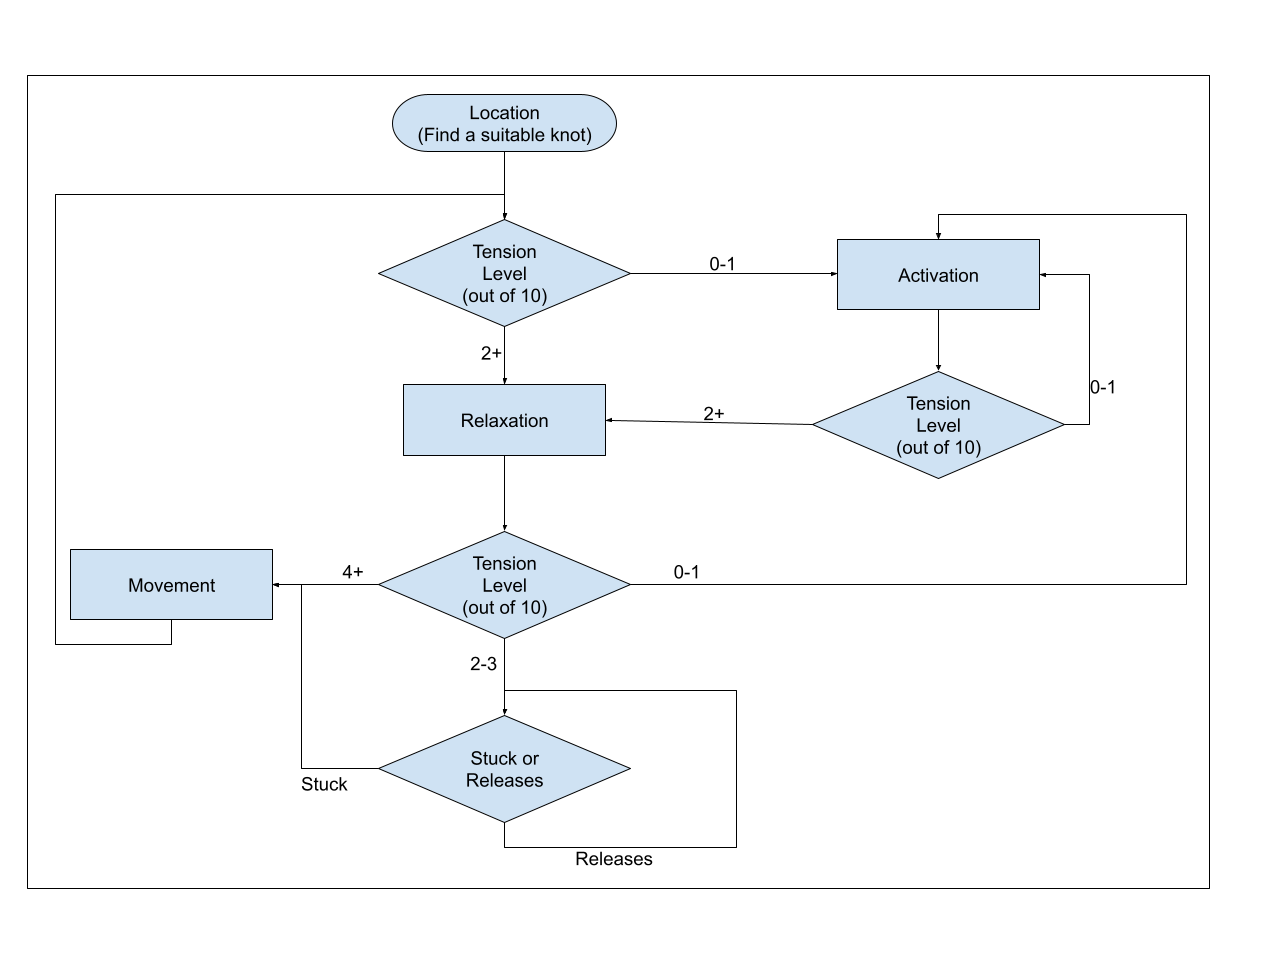
Playing with Knots Stages

  • Location is the first step to playing with knots and is focused on finding a knot that can be played with. A good way to start is to choose a stretch sequence, get relaxed in the starting pose, and then proceed with the movements until you locate a slightly tense area. Try to picture this tight muscle area in your mind and see if you can imagine the size and shape of the knot causing it. This mental image doesn’t need to be precise. It just needs to be approximate so you can use other techniques to refine the image later. If the tension level sensed is very low (0 to 1 out of 10), move to the Activation stage. If tension levels are higher (2+ out of 10), move to the Relaxation stage.
  • Relaxation is done when sensed tension levels rise to level 2 (out of 10) or higher with a goal to reduce tension levels to between levels 0 and 1. This is done using SPPM with a control point chosen at least a few inches away, but ideally two feet or more, from where you feel the tightness. Start by using big exhales to relax the tightness while keeping the control point at the same location in space. If the tension level drops down to level 0 (no tension sensed) or level 1 (very gentle resistance), proceed with the Activation step. If the tension gets to level 2-3, listen closely for microreleases. Stay here if the releases keep coming. Proceed with the Movement stage if your body seems stuck at this tension level and you don’t sense any tension releases.

    Sometimes this type of relaxation will actually increase the tension level you sense. This can usually be solved by decreasing the depth of the stretch. It may seem backward that you have to decrease a stretch when you relax, but this is one case where a step back is needed to make progress on releasing a knot system. This can happen when releasing active parts of a knot causes dormant parts of the knot to activate to compensate. If you can relax the shallower stretch, slowly proceed back to the depth you were at previously to see if you can relax that position. If the shallower position remains at level 2 tension or higher after relaxing, go to an even shallower position until you can relax down to level 0 or 1. It may help to move back and forth to different depths a few times, relaxing at each position until you feel the knot has released or you become fatigued.

    There may be times during relaxation when you sense a large amount of unnecessary tension may be about to be released. Use some caution when this happens, as releasing too much tension all at once can cause overall tension levels to quickly rise too high or spasm and force you to abort the stretch. When you sense a large bunch of tightness can be released, try just letting go of half or a quarter of the tightness. This means giving in to some of the urges to tighten up and maybe even reinforcing some of those tightening urges for a few seconds so that the releases can be done in stages instead of all at once. This can allow you to continue with the stretch sequence for longer and release muscle fibers that might take a long time to access. However, it can also be effective, but riskier, to just let all the tightness go at once to see what happens.
  • Activation should be performed when sensed tension levels fall back to level 0 or 1. Activation is about gently increasing the tension level by adjusting your body positioning or body expansion to a level that is slightly more difficult to keep relaxed. There are several ways to trigger activation. One way is by shifting your balance point slightly in one direction and trying to re-relax. Another method is to perform some targeted microexpansions along specific locations of the area of interest. A third method is to perform an area expansion in a location near the knot being targeted. The last method is to gently press part of your body that is touching or nearly touching the floor further into the floor. Both the microexpansions and area expansions are best done in muscle areas near the knot where nothing is being felt, as this may alert your brain to secondary tension that may be contributing to the knot of interest. When tension levels rise to 2+, proceed with the Relaxation stage.
  • Movement is done when relaxation doesn’t lower the tension level below 4 or level 2-3 without any sensed tension releases. This should be a gentle, slow movement to a position that you expect will feel less of a stretch. Typically this will be a small reverse movement back toward your starting position. If the tension level sensed at this new position is very low, move to the Activation stage. If tension levels are higher (2+ out of 10), move back to the Relaxation stage.

The location where tension is felt may shift dramatically as one muscle area is released and another tightens up to compensate. This tightening feeling may not actually be increased tension, but increased perceived muscle tension. When the brain senses the exact same tension for long periods of time, it eventually tunes out that signal. When the tension signals change, your brain stops ignoring them and alerts your consciousness. This is normal and should be seen as a sign that progress has been made, even if the tension level felt is higher than before for the same body positioning. Tension must be felt before it can be released, so you should view those tight sensations as the first step to releasing that tension.

Playing with Knots Example

An example of playing with knots goes like this:

  1. I begin by centering myself in my chair, so I feel balanced and completely relaxed. I remind myself that I can feel almost exactly that relaxed no matter how wide my throat opens
  2. I gently open a singer’s expansion just to the point of sensing some resistance to the current expansion level.
  3. I feel a level 2 (out of 10) tightness in the back of my throat.
  4. I focus my thoughts on where I feel that tightness. It feels like it connects from the back of my throat to the back of my jaw.
  5. I back off my expansion, prioritizing relaxation. My gentle awareness of the back of the throat tightness lowers the tightness sensed to level 1, while still maintaining the (slightly smaller) singer’s expansion.
  6. I remind myself that this gentle level 1 tightness (or level 0) should be all that is felt if my head were moved in any direction from the current pose. I make a few tiny, gentle head movements, pointing my nose slightly up and down, feeling small pops in the lower back of my throat.
  7. I slowly increase the size of the gentle head movements, keeping the expected tension level low as I perform a tension visualization.
  8. I find the level 2 tightness come back. I relax the area until it comes back to level 1.
  9. This time I try sending some light area expansions in the area where the tightness is felt.
  10. I sense some brief level 3 tightness that quickly crackles in the back of my throat and moves to a level 1 tightness.
  11. I next sense tightness building much deeper in my throat. I shift my tension visualization efforts to this area.
  12. I send gentle relaxation signals.
  13. I sense pops in the back of my throat an inch or two away from the level 2 tightness.
  14. I focus on getting back to a totally relaxed feeling in my entire throat.
  15. I might repeat this several times, updating my tension map each time.

Freeform Stretching

Freeform stretching is also done as a sequence of poses, but much more improvised, with much fewer pre-planned movements and more going with the flow. It allows the focus of a stretch to change significantly with how your body feels and keeps the stretch session interesting and varied, like an open-world video game. The improvised nature also allows me to discover new stretches that work for my body that I may never have considered before. It is an excellent companion to playing with knots,

Freeform Stretching Example

I’ll give an example:

  1. I start by beginning a standing fold.
  2. I make it one-quarter of the way down and get a sense of lower back tightness that seems to be creeping up in tightness instead of releasing.
  3. I then pause for a while and try to relax that lower back tightness with some SPPR technique by focusing on positioning my chest and feet while relaxing the rest of my body. I get a few minireleases, but sense that this lower back knot would have an easier time releasing if I reverse directions.
  4. I start moving my chest upward and feel more satisfying cracks and pops.
  5. I start visualizing this lower back knot, which makes me want to know more about its shape and size to get a more accurate picture in my head.
  6. This leads me to start to move my upper torso a bit to the left to see how wide the knot goes on that side.
  7. Then, I move back to the center and check the right side for a bit. I feel some of the tension from my lower back release for a bit, but start feeling my right ankle tightening up to maintain balance.
  8. I shift my focus to moving my center of gravity to more closely align with my balance point so that my right ankle can relax. I feel my right ankle let go.
  9. I start doing some microexpansions of my right ankle and calf to test if they are truly relaxed. The ankle tightens back up quickly and stays tight despite attempts to relax it.
  10. I decide to leave the ankle alone, but feel my balance is a bit off-center again.
  11. This leads me to be curious as to how my left ankle would respond to a microexpansion. I attempt gentle microexpansions of the left ankle and feel a bit more balanced.
  12. This feeling of being balanced leads me to want to try feeling balanced with my weight in different directions, so I gently shift a tiny bit of weight to the balls of my feet. This makes me feel like I am pressing my feet into the ground.
  13. I counter this by trying to lift the balls of my feet while keeping my upper body in place. I am unable to lift the balls of my feet from the floor, but attempting it causes some tight muscles to let go in my ankles.
  14. I then try pressing the balls of my feet firmly into the floor and relax without moving my upper body.

Benefits of Freeform Stretching

This type of freeform stretching game makes the stretching experience more varied and less robotic. It becomes more like a video game where I am trying to score points by releasing some tension. It also allows me to stretch a lot of different muscle groups while building my understanding of the connections between tightness in different areas.

WorldFest 2023 Workshops Highlights

At this year’s California WorldFest in Grass Valley, I led two in-person workshops on sequential stretching™ on July 14 and 15.

Our campsite at Nevada County Fairgrounds

The Friday workshop included these stretch sequences:

Dominant Arm Swing

Table to Cat to Cow stretch

Expanding Cavern

The Saturday workshop included these stretch sequences:

Shoulder Circles

Walking Tripod

Head Lateral Swings

I feel that the workshops went wonderfully this year. Despite the heat, there were lots of pine trees for shade in most parts of the festival. I also felt like I made real connections with the participants and opened up their minds to some of my crazy stretching methodologies. I hope many of them will follow up by booking (currently free) individual lessons and/or following along with videos I’ve made on the techniques.

This year, I brought the microphone and amplifier again in case they were needed, but I decided people could hear me OK without them so I didn’t use them. This seemed to help improve the experience without the equipment in the way of talking with the attendees.

I also made time in between stretch sequences to ask about where and how they are feeling the stretch and get additional feedback. I found the responses fascinating, especially how each person experiences the stretch sequence in completely different parts of their body. Some of the more flexible attendees even found they didn’t feel some of the stretches at all because I failed to mention how to scale the stretch for different levels of flexibility.

Attendees seem to have the most trouble with two aspects of the stretch sequences:

  1. Moving slowly. This is something that comes easily to me, so it’s a great reminder that it doesn’t come easily for everyone mentally or physically. In the future, I’ll try to make some time to teach how to build up the ability to move slowly.
  2. Keeping arms up in the air for several minutes or more. I do strength training regularly, which might make this easier for me. However, I also think that even people with less strength can overcome this by:
    • taking frequent breaks from the movement
    • re-framing the issue of muscle fatigue as being instead about the body telling us we’re using the wrong muscles for that position
    • decreasing how high you go in the motion

About 12 people in total attend the workshops, which was a nice improvement over the 5-6 people last year.

I am again grateful to Kat Pierdon for assisting me with the workshops, especially with promotion.

Kat and Mark enjoying some world music
Lions Lake at the campground

Next in-person workshops at California WorldFest 2023

I am excited to announce that I will be conducting two new workshops on Sequential Stretching™ at WorldFest this July 14-15 in Grass Valley, CA.

My workshops will be at these two times:

  1. Friday, July 14, 2023 at 3:00 PM at the Loadin’ Chute stage
  2. Saturday, July 15, 2023 at 12:30 PM at the Meadow Lawn

Bring a yoga mat if you have one. This will be a great opportunity to experience the deep relaxation and tension release that come from this technique.

WorldFest is an awesome world music festival in a scenic forest location. They also have a lot of great workshops on yoga, healing, and living earth-friendly. Tickets are available on the WorldFest website.

Ticklies Therapy for Calming Nerves and Pain Relief

Ticklies Therapy is a side project that I worked on that is not directly connected to flexibility or Sequential Stretching™. I’m posting about it here because it has some similar benefits as Sequential Stretching for issues like pain relief and relaxation. It was created by my partner, Kat Pierdon. She and I developed it further to help with some of her chronic issues with fibromyalgia, headaches, chronic pain, stomach upset, and nausea.

Try it out with a partner and let me know what you think.

Watch and Learn: Wrist Balance, Lying Relaxation, and More

Watch and follow along with these new sequential stretching™ individual lesson videos. This set is mostly focused on relaxation, which is the core of reducing muscle tension and improving flexibility.

  1. Sequential Stretching Individual Lesson – Wrist Balance
  2. Sequential Stretching Individual Lesson – Lying Relaxation
  3. Sequential Stretching Individual Lesson – Cross-legged Balance

Book your lesson today!

For a limited time, individual Sequential Stretching lessons are available free of charge. Book a personal flexibility appointment today with Mark Witherspoon, creator of Sequential Stretching. Appointments are available for any experience level. Appointments are approximately 1 hour in length and are currently available via Skype or Zoom.

New Sequential Stretching™ Individual Lessons Videos

  1. Sequential Stretching Individual Lesson – Supported Forward Lean
  2. Sequential Stretching Individual Lesson – Neck bends
  3. Sequential Stretching Individual Lesson – Wrist circles
  4. Sequential Stretching Individual Lesson – Tension awareness, flow, symmetry (Lesson Wrap up)

Book your lesson today!

For a limited time, individual Sequential Stretching lessons are available free of charge. Book a personal flexibility appointment today with Mark Witherspoon, creator of Sequential Stretching. Appointments are available for any experience level. Appointments are approximately 1 hour in length and are currently available via Zoom Meeting.

WorldFest 2022 Workshop Highlights

I presented the first in-person workshop on Sequential Stretching™ at California WorldFest in Grass Valley, CA on July 16, 2022. It was exciting to finally do the in-person class I have been dreaming of for the last few years!

I think it went well overall. The participants seemed engaged for the approximately 1 hour 15 minutes that it lasted. I got to work with 5-6 people who had never been exposed to these techniques before. It was great talking with people afterward and getting real-time feedback on how people were feeling during the stretch sequences.

My new dry-erase board for in-person and online classes

We did the following stretch sequences:

Standing Bent Wrist

Standing Squat

Cross-legged Weight Shifts

Leg-forward Tripod

I recorded video of most of the workshop, but unfortunately, the audio recording was not usable due to the festival music playing at the same time and the lack of microphone-direct recording. But, I did get some photos of the event.

I learned some valuable lessons to improve next time:

  1. Bring a signup sheet to collect people for my mailing list.
  2. Try going around the audience to get feedback on muscle tension levels periodically during the stretch sequences instead of asking for volunteers.
  3. Get microphone-direct audio for the video recording.
  4. Make sure someone is checking on the cameras to get the best framing and restart them when they shut off. Kat’s camera stops recording after 30 minutes. My phone stopped recording after 45 minutes.
  5. Find a way to either: hear myself through the microphone so I don’t feel like I have to project or just learn to talk normally and trust people will let me know if they can’t hear.

I am grateful to Kat Pierdon for assisting me with the workshop. I hope this is the start of many more in-person classes on Sequential Stretching.

First in-person workshop at California WorldFest 2022!

I will be conducting the first-ever in-person workshop on Sequential Stretching™ at WorldFest this summer. I’m scheduled for 12:30 PM – 1:30 PM (Note: Time Changed) on Saturday, July 16 on the Evergreen stage. WorldFest is an awesome world music festival in a scenic forest location in Grass Valley, CA. They also have a lot of great workshops on yoga, healing, and living earth-friendly. Tickets are available on the WorldFest website.

Entry Points and Cascading Tension Release

Sequential Stretching™ is a relatively simple set of techniques for improving flexibility and reducing chronic tension. But there are some challenges to starting effective use of these techniques. As I’ve been focusing more on teaching this directly to other people, one of the hardest parts has been guiding them toward what I call entry points and cascading tension release.

Entry Sign

Entry Points

Entry points are body positions where unnecessary muscle tension is low, but near to body positions with slight muscle tension, making tension release possible. Finding a good entry point is the one of the first key steps to executing an effective stretch sequence for your body.

Identifying Good Entry Points

Sequential Stretching is built on the concept that stretches should not be done in a single body position, but in a range of closely related positions. Ideally, the starting position will be in a highly relaxed position with no unnecessary tension felt. This starting position is a good candidate for an entry point, but you might not get to an entry point until you have progressed partway into the sequence. Slight changes from this position might start to engage barely perceptible muscle tension. The slower you move, the easier it is to sense this tension.

One of the biggest challenges is locating good entry points for your current level of flexibility. I can show you the entry points that work for my level of flexibility, but those may not work for you if they are too tight for your body. If you are much more flexible in that part of the body than I, you might need to reach a more challenging position before you arrive at an entry point. Finding a good entry point usually means you can find a good stretch sequence based on that entry point.

A good entry point is one that has a low starting tension level and a slow ramp-up in tension around that point. For example: sitting with your head facing straight ahead might be a good entry point for some neck stretches if you can move your head slightly forward and backward with slowly increasing tension as your head moves farther from the center of your body.

Each person may have unique entry points, but the steps for getting to them should be similar between people. I have located a dozen or so entry points for my body that meet these conditions. To find your own particular entry points, I suggest you try some of the stretch sequences on this website. Each stretch sequence has many variations to it which can be done to work different muscle areas, but the variations might be necessary to get you to an entry point for your body.

Cascading Waterfall

Cascading Tension Release

Cascading Tension Release (CTR) is the connected unlocking of a series of tight muscle fibers during a stretch sequence. CTR is the pinnacle of effective stretching, the most efficient way to release muscle tension, and feels amazingly pleasant and relaxing. It happens when the conditions of the body and mind are right so that minimal unnecessary tension blocks the release of stuck muscle fibers in a series. Slight movement or relaxation triggers one stuck fiber to release, which unlocks several other stuck fibers, which each unlock several other fibers, creating an avalanche of muscle release. CTR often feels similar to unraveling a sweater once a loose thread is pulled.

When you are mindful of these microreleases during CTR, you will feel them continuously keep releasing for at least ten seconds, but potentially for hours, if you can keep them going. It can make you feel connected to more of your body and often feels like you have explored muscles of your body you didn’t even realize were there.

To reach a state of CTR, you first need to get your body to an entry point. Then, you need to figure out what body position commands from the entry point will keep the releases flowing. This means that you find a sequence of body positions that have tight muscle fibers to release, but not so many tight muscle fibers that they all block each other from releasing.

Keeping CTR flowing

Once you enter a state of CTR, you should try to stay in it for as long as possible because it can potentially release a significant section of muscle knots in a short period of time. It can be difficult to get back into quickly, so it is helpful to put off any interruptions once you get into CTR. To remain in CTR, you need to keep your body in the groove that allowed it to start. The following are the primary methods I use to keep the CTR going.

  • Use deep breathing and direct the exhales to the area that you can feel releasing. If you feel the microreleases continuing without moving anything but your breathing, keep doing that.
  • Find a particular direction to gently move a body part toward. For example, in the Expanding Cavern Stretch Sequence, I use circular head movements to keep tension releases flowing. In the Standing Squat Stretch Sequence, I use the slow lowering of my tailbone position to stay in CTR once the microreleases slow down or stop at the current tailbone position.
  • If a particular movement direction is being used and you feel tension levels increasing, try pausing for a few seconds at a body position before proceeding down the planned path. If tensions levels continue to increase, try reversing the direction and try to remember how relaxed that position felt when you were there previously. It may still feel tighter than before since some tension release in one muscle area may shift the load and allow you to feel tension in another area that your body may have tuned out previously.
  • Try moving more slowly. Sometimes I think I am moving as slowly as possible, but I find I can move a little slower if I watch a point on my body (like my hand in the Raise Your Hand Stretch Sequence) that I can see moving and make it move slower than I can sense through my internal muscle sensors.
  • Anticipate when your body is about to lose relaxation because some muscle areas are about to activate. Remind yourself of your current Simplified Positional Posing and Movement command, mentally reinforce your belief that a chosen part of your body can remain at this position without feeling any muscle tightness, and imagine a bigger section of your body that can completely release.
  • Shift work back and forth between muscle groups by shifting your bodyweight to different sides of your balance point.
  • As with most aspects of Sequential Stretching, use of cannabis is helpful to relax enough that you can get to an entry point and to make it easier to sense the microreleases so that you can steer your body in the direction that will keep the CTR going.

Terminology of Sequential Stretching™

You may come across some unfamiliar terms as you read these articles. This glossary of terms defines most of the terminology I use to describe the stretching techniques on this website.

Area Expansion: commanding part of the body to get bigger or to inflate a substantial section of the body.

Area Contraction: commanding part of the body to get smaller or to deflate a substantial section of the body.

Bidirectional Tension Modulation: increasing and decreasing tension levels toward the optimal range for tension release by adjusting the body position, using area expansions/contractions, or targeted microexpansions.

Cascading Tension Release (CTR): connected unlocking of a series of tight muscle fibers during a stretch sequence.

Dynamic Stretch: an active movement where joints and muscles go through a full range of motion.

Entry point: body position where unnecessary muscle tension is low but near to body positions with slight muscle tension, making tension release possible

Exploratory Movement: picking specific points or large areas in the body and gently attempting to move them in a particular direction, expansion, or contraction during the stretch sequence. The points or areas on the body may have no known ability to move in that way, but can suddenly spring to life when prompted, sometimes exposing knots that were previously imperceptible.

External Sensory Deprivation: starving the mind of sights, sounds, and sensations outside of the body while heightening the perception of tension and the sounds and feelings of microreleases. A darkened, temperate, quiet room with eyes closed and mind focused on the body is an example of this.

Microexpansion: commanding a small point on the body to get bigger or inflate.

Microrelease: a tiny release of muscle tension that may be perceived as pops, cracks, tingles, foreign-feeling muscle sensations or movement, choppy motion, and/or temperature changes.

Microstretch: a brief static stretch that takes place as part of a stretch sequence.

Mindfulness: a mental state achieved by focusing your awareness on bodily sensations.

Minirelease: a small, but significant, release of muscle tension where unconscious repositioning of muscle tissue takes place as a consequence of a series of microreleases.

Muscle Knot: a section of muscle tissue that is stuck in a state of continuous contraction or continuous expansion, often causing pain when disturbed and reduced range of motion.

Muscle Isolation: using body positioning, gravity, or limbs not directly involved in the stretch to disengage the muscles being stretched.

Muscle Spasm (Muscle Cramp): painful contractions and tightening of muscles that occur when muscles involuntarily and forcibly contract uncontrollably and can’t relax.

Muscle Tension: perceivable tightness of muscle tissue and connective tissue that can range from the slightest pull to extremely painful spasms.

Range of Motion (ROM): the capability of a joint to go through its complete spectrum of movements.

Sequential Stretching: a set of flexibility techniques developed by Mark Witherspoon that use gentle, slow motion, directed breathing, and careful mindfulness of tension as you move through a sequence of relaxed body poses.

Simplified Positional Posing and Movement (SPPM): mental simplification of body positioning by thinking only of one or a few specific control points on the body to position in space throughout the sequence, allowing the instinctual parts of the nervous system to decide on the most relaxed positioning of all other muscles.

Static Stretch: stretches that you hold in place for a period of time, without movement

Stretch Sequence: a series of connected microstretches with tiny position changes in between each microstretch, staying just long enough at each point to gauge tension levels and relax.

Tension Map: a mental picture of an area of the body that indicates how tight each part of that area feels. Often created using tension visualization.

Tension Release: restoring the ability of a section of tight muscle to move.

Tension Visualization: mentally creating a picture of the varying levels of tension throughout the range of motion (tension map) felt while moving through the sequence.